Monday, September 17, 2012

On My Design Wall 9/17

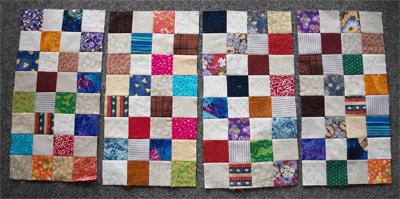
More swap blocks have surfaced in my unpacking. I sure hoped to be all done unpacking by now, but we got REALLY busy right away after this move *sigh*

I put these blocks up and now need to find my black Kona cotton so that  I can make some more blocks with some knick-knacks to go between the books :)

For more design wall inspiration check out Patchwork Times

Wednesday, September 12, 2012

Yes, we are still alive!

We are still alive and already busy in our new location *sigh* I always liked moving because we were not so busy for the first few months.

The Army Guy has been working on projects to help get my sewing area more efficient. I'll post sometime when I things put away (it is already messy)

I haven't been sewing/quilting much as we are still trying to figure out our new normal. I'm looking forward to some quality time with my machines...

We have started up our more formal homeschool year. The Boybarian had his first lab today and nothing blew up (the Army Guy was a little bit disappointed, but HE wasn't to supervise the lab).

Here's hoping I'll be back here more consistently now that structured learning has gotten a routine going...

Monday, August 6, 2012

Design Wall Monday and Birthdays

On my design Wall this week are some blocks I found while unpacking a box...I guess I need to get out my Karen Stone EQ patterns to make more of these blocks...I just love them!
Life has been busy...still have lots of boxes to unpack...we are already getting busy in our new home *sigh*

PLUS we just had a couple of birthdays at our house:
Princess Sunshine had another birthday (and didn't want to share her face). She had a traditional birthday cake. I was the one who got to make it, something I'm not used to doing as The Peanut alwasy did that before our move.

For his 14th birthday, The Boybarian didn't want a cake (YAY! no icing overload this year!). He and The Army Guy made a Strawberry Rhubarb pie instead.

For some real inspiration check out Patchwork Times for other design wall posts~

Monday, June 25, 2012

Design Wall Monday

I have a design wall!!! My sister  came down and helped me do some unpacking and setting up in my sewing/quilting  area.  What a relief it is to finally have more than piles and piles of boxes in one room (other  rooms still suffer).
 On my design wall are a bunch of stars from a swap, a pair of test blocks and a bleach dispersed  piece of fabric that is inspiration for an art quilt. These are all  pieces that make me happy, so the might just inspire me!
 My  design wall is in a somewhat awkward place as it is behind the ironing board. And with unpacking, the ironing board is a mess. I have yet to find my iron, so it may be in this condition for a bit longer.
 Here is the sewing area. I had to get some small stuff up on the wall so I wasn't just looking at  boring walls while I sew :)

I'm still  unpacking boxes and  trying to find where to put things  in a more compact space (though  much nicer than my last digs).
And  I've got the  frame up  and the  machine on the frame.  Still need to connect all the cords and the light, but we are making progress - along with the fact that some  pieces  got lost in the move and I'm waiting for replacement  parts *sigh*

The top on the frame is one I made over 17 years ago, it was unearthed in a  box last week.  I think I'll work on this one first to get back into the groove of machine quilting.

The tall cabinets are for fabric storage. They have SOME fabric in them, but are  still awaiting the bulk of my fabrics...that are somewhere, in a box, in the  house or garage!

For more design wall inspiration visit Patchwork Times.


Monday, June 18, 2012

Why I have no Design Wall Monday picture

I still don't have a design wall! Mostly because I don't have anything put together for a sewing/quilting area...just boxes *sigh*

This is what my designated Sewing Dungeon looked  like Saturday at noon...since then I moved  the cabinets, went through almost all of those boxes,  and  felt very frustrated. yes, there are three sewing machines, a quilting machine and a serger in those containers, but less than three yards  of fabric! Most of these boxes were mislabeled. I learned that if it said "Sewing Supplies" it contained anything BUT things I could use with sewing/quilting. I found four boxes of Christmas decorations, several boxes of toys, computer things (not EQ) and lots of papercrafting supplies. I didn't find my box of thread or any of my stash of fabrics.

Onward! I will find fabrics, I will set up the  quilting  machine, I will find batting (there is a  large box in the other room that *might* have my roll of batting) and I will be sewing/quilting on something by the end of this week (or else I will go bonkers!).

May your week be most successful!

And, to be inspired by people  who really have design walls check out Patchwork Times!

For some eye candy...while at my ILs house I did work on an old row robin that I had stashed away:
This is Batik Jewels and I got the rows sewn together...I also started adding borders. There is one more border to go on this one and then I can quilt it (when the quilting machine/frame are set up). Princess Sunshine thought this would look really good in her new bedroom...

Tuesday, May 22, 2012

Scrapbusting Mystery - clue Six (final clue!)

Clue Six
Shout4Joy©2012

STEP ONE: Take 4 of the HST scrappy units from Clue #3, one scrappy diamond unit from Clue #4 and your four border fabric Chevron units from Clue #5 and sew them together for the center unit as shown.
NOTE: IF you have borders around your scrappy diamond units (see Clue #4), use the one with the border fabric for this step.

< STEP TWO: For the first border, take your 16 patch units from Clue #5 and sew them together in pairs. Then, using the scrappy diamond units from Clue #4 in the corners, sew these borders around your center unit.

NOTE: IF you have borders around your scrappy diamond units (See Clue #4), use the ones with background fabric borders for this step.
STEP THREE: For the second border, sew four scrappy Chevron units from Clue #5 together, end to end making four border lengths. Using the HST scrappy units as corner blocks, sew the borders to the quilt. 
< NOTE: IF you trimmed your HST to 5” in Clue #3, Cut twenty 1 1/2” X 5” strips of assorted background fabrics. Insert these strips between the scrappy chevron units as you sew the four pairs together. Sew one strip to each end of your chevron rows. These are your border lengths needed for STEP THREE. Sew borders to quilt as described in Step Three.

STEP FOUR: SINGLE FABRIC BORDERS
Cut 6 strips, WOF, 5 1/2” wide from your border fabric. Sew these strips together end to end. I like to use a diagonal seam, but use whatever works best for your sewing skill set.
Take your quilt and measure the center from top to bottom and cut two pieces to this length from your border fabric strip, sewing them to the sides of your quilt center.

Press the seams toward the borders.
Measure the center of your quilt top from side to side and cut the two remaining borders from your border fabric strip and sew them to the top and bottom of your quilt. >

Press the seams toward the borders.

Quilt as desired. Suggested quilting would be any all over design as this quilt is SO busy that custom quilting could be lost!

Enjoy your quilt! (sorry about the borders fading into the carpet...I'm in transit and have no design wall!)
You can add more borders to make a bigger quilt. This quilt design will measure 80” X 100” if all units measure 5”... AND it uses up a bit more from the scrap bin!

Shout4Joy©2012

Monday, May 14, 2012

AAARRGGHHH!

I meant to have the final clue psted by this time, but forgot to keep my power cords away from the movers...so my trusty computer does not have power and the library won't let me input my pictures into their computer so that I could upload them *sigh*

Our move is in process...please pray with us that we will get a closing date - SOON!

And may your sewing and quilting go smoothly while I am itching to quilt!