Wednesday, February 22, 2017

Drawing Fabric

In my Drawing for Graphic Design class, we had to draw fabric in graphite (pencil). The fabric was draped and knotted around an easel and we had to make an interesting composition out of what was there. Light fabrics, heavy fabrics, patterned  fabrics and dark vs light, etc.

My favorite spot was already crowded with other students, so this is what I came up with ... it is a bit washed out in the photo, but you can get the idea ...

I think it turned out pretty good ... I can see areas that I could tweak, but I have probably spent 6 or 7 hours on the drawing as it is and I am done. It needs to be turned in tomorrow morning and I can't stay up all night tweaking a drawing!

Sunday, February 19, 2017

Project Quilting - Bright Challenge

This week I chose my fabrics fairly early, but didn't get around to playing with them until late ... I chose to make a portfolio bag with some of my bright fabrics.

The pink fabric told me it wanted to be the outer fabric so I quilted it with the turquoise as the inner fabric.Cut out the pieces and moved on to the strap.

I was going to use the bright green for the strap ... but it just didn't work for me. I chose a solid black instead which makes the bright print seem brighter.
I challenged myself to use a fancy stitch design on the handle. This is something I have been a bit afraid of since getting my new machine in August. If I've got those stitches, I need to learn to use them!
The bag used three bright fabrics and a solid black.
 I used bright zippers to add to the bright, happy look.
AND I now have a bright, happy portfolio that I can lug magazines or patterns around in. Just in time for a class with Bonnie Hunter next month and with Kim Lapacek the following month!
I might add some more pockets to it later, maybe that green fabric will make an appearance in the middle!

The other entries are found HERE

Friday, February 10, 2017

Where do you find ideas?

I needed to visit a court house today for a document and was tickled to see this floor ... I will be working with some ideas in EQ over the next week ...

What triggers ideas for you?

Wednesday, February 8, 2017

Conversation Hearts - let's finish it up!

Trim your embroidered squares to 6 1/2" 

Cut background fabric into:
1 - 18 1/2" Square
1 - 12 1/2" X 18 1/2" 
2 - 24 1/2" X 6 1/2"
6 - 12 1/2" X 6 1/2"
4 - 6 1/2" squares
5 - 3 1/2" WOF strips (borders)
Assemble the upper right corner as shown:
Add the 18 1/2" square to the left of the unit:
 Assemble the middle section as shown:
Add the 12 1/2" X 18 1/2" rectangle the left of the unit as shown:
 Assemble the bottom section as shown:
Now assemble the field of the quilt:
Take your 3 1/2" strips, and sew them end to end, making one very long strip. I like to sew them together with a 45* angle, but this is not necessary.
Measure the quilt field through the center of the quilt, top to bottom. Take that measurement and cut two pieces from the long border strip. sew these to the sides of your quilt. Press the seam allowance toward the border strips.

Measure through the center of the quilt, side to side. Take this measurement and cut two pieces from the long border strip. Sew these to the top and bottom of your quilt. Press the seam allowance toward the border strips.

My measurements are shown in the diagram below:
Now your top is put together!

Quilt as desired ... I
used a freemotion all over pattern that is reminiscent of a fluer de lys.

Now take your 2 1/2" strips cut from your Fat Quarters and sew them together end to end. Again, I like to sew mine together on the bias, using a 45* angle to avoid bulk. Iron this in half down the length and attach as double fold binding to your quilt. I like to sew the binding to the front, pull binding to the back, glue baste the binding down and then stitch in the ditch from the front, catching the binding on the back.
 Your Conversation Hearts quilt is now finished!

Materials List 
Pieced Heart Blocks 
Embroidered Heart Blocks

Monday, February 6, 2017

We have a Winner!

Using a random number generator, 
we have a winner:
Grandma said...I love blue and yellow.
 
"Grandma"  - contact me by the end of Thursday, February 9, so I can get the book out to you :)


Step Two - Converstaion Hearts

Now it is time for the Embroidered Hearts.
Take inspiration from candies, they are everywhere this time of year, so go on out and buy some if you can't think of words to use on your hearts.

Cut three 8" Squares of background fabric.
  For the hearts. download the heart template and the letters. Insert these images into a document and make sure the images are sized at 6 1/2" wide. Print these pages to use for tracing your embroidery designs.


Trace a heart on the middle of each 8" square of background fabric. 

A light box is a great way to trace these images. If you do not have a light box, you can tape (using painter's tape) the paper and fabric to a window on a bright day and then trace. 
Choose your sayings and trace the letters in the center each heart. Use your favorite method to mark the images. I used a water soluble pencil.
 Choose your embroidery floss colors.
 Using a back stitch, stem stitch, split stitch or a chain stitch embroider the heart and the letters.

If you need a refresher on how to do any of these stitches, check out Sublime Stitching.


Check back on Wednesday for the setting instructions :)

Saturday, February 4, 2017

Texture: Project Quilting Season 8, Challenge 3

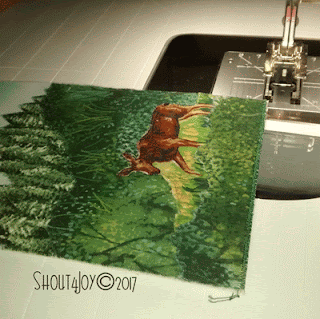
Thinking over the challenge all week, I wasn't sure what I was going to do ... My first plan was going to take time that I didn't have, so I tried to figure out what to do. Hanging from my bulletin board was a really cool trim piece that I have used for landscape postcards in the past and that brought my idea to life - the texture of this trim is perfect for the challenge! Texture in the Wild ...

I forgot to grab pictures of the of the process, hopefully you can imagine the process of choosing landscape textures from my stash, finding a moose to inhabit the landscape and using raw edge applique to attach the fabrics to my Peltex base.

I like to use a satin stitch on the edges of my postcards ...
... stitching around the outside more than one to insure a good solid edge, especially on the fabrics that don't match the thread.
 This is where the textured trim comes in. I cut a length and sew it to the bottom of the card with a straight stitch as fancy stitches won't show up in the fringe.
A 4"X6" postcard - Textured Landscape.
 This postcard will go to a local fundraiser to the Muskegon Museum of Art for their Postcard Salon coming up in a few weeks.

I finished Challenge Three of Project Quilting Season 8!


Piecing the Conversation Heart blocks

For each Heart Block:


2 – color 3 ½” X 6 ½” rectangles
4 – background 2” squares
2 – background 3 ½” squares

Also cut 3 strips 2 ½” X 22" and set aside for scrappy binding.  


Draw a diagonal line on the back of each of the background squares.

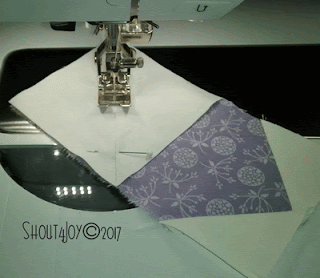
Align a 2” background square with the corner of the rectangle and sew along the diagonal line.


Trim seam and press the corner up and the seam toward the background fabric.

Align another 2” background square with the other top corner and sew, trim, press as with the first corner.
 
 
Take one of the 3 ½”background squares and sew it to the bottom of the unit. 

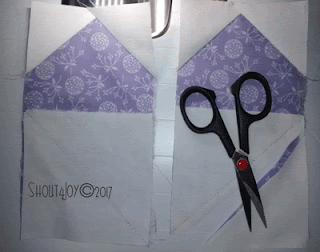
Take the other 3 ½”background square and sew it to the bottom of the other unit, making a mirrored image of the first unit.
Double check to make sure that your units mirror one another BEFORE trimming and pressing.
 You now have two units.
Sew the units together. I like to pin the seam intersections so that the seams match up. Remember to remove the pin as you come up to it!
Press the center seam open. I like to use That Purple Thang to hold the seam open as I press.
 You now have one completed block.
Make six with your assorted Fat Quarters.

Next instructions - Monday, February 6 :)

To see the whole quilt and the material requirements click here.