Monday, December 18, 2017

long time no post ... I'm still here!

 I had a few Christmas presents to make for friends and thought I would try the Cupcake Mix Recipes. I like how precise these are - but there is still paper to deal with, peeling it off of your HSTs (this is recipe #4 for those who would like to use the same one).  I used batiks from my stash, cutting them down to 5" squares to use with this recipe.
 I made a pile of the blocks and then added a border around each block. I am loving the saturated and happy colors that I used for these blocks!
I then sewed the blocks as pocket. I found this fun fabric for the insides of the pockets (wonder if any of the recipients peeked inside the pockets to see this hidden treasure?).

The pockets were then sewn to pre-made canvas tote bags. The bags have a zipper across the top and a zip pocket inside. These totes are a great size for a project bag or for shopping :)
I hope they all enjoy their bags (I have one for me, too! I know *I* will enjoy it!).

What are you creating this year for Christmas gifts?

Saturday, July 1, 2017

a photo finish, or rather, a photo of a finished quilt :)

One of the nephews got married in June to his long-time sweetheart :) I finished a quilt for a wedding present ... and forgot to take a picture of the finished quilt before giving it to them. My sister-in-law took a picture of them with the quilt - all exhausted after getting home from their honeymoon trip.

Now to finish the other wedding quilt I had started. It will be late, but I will finish it!

Monday, June 26, 2017

Long time no post!

 I have been busy! I finished my Associate's degree, got a part time job (in a quilt shop) and we bought a house ... not a lot of quilting time in there!
I have been working on some quilty things, got a couple quilts done for wedding gifts (and a couple more to go). I am thankful for UFOs that I can pull out and finish off!
I am looking forward to having my sewing space up and running at our new house ... but there are other things on dh's list before he gets to my space *sigh*

What is going on in your neck of the woods?

Saturday, March 4, 2017

Dapper and Cool

 I spent a long time deciding what fabric would work best for the background. (see previous post for the process up to this point) Since the Applique is all in batiks, I kept trying to find a batik that worked ... none worked from my stash, so off I went to the LQS. I tried many batiks and they all were just not right for the look I was going for.

batik was too ... 60s

So, we pulled some other fabrics and came across this one that looks like a menswear jacket. 
PERFECT!

So, to the cutting mat I went. I wanted to add some borders and chose this batik (that had been in the running for a background). I decided to break the frame with my first border and build from there. 
 
 sewing borders
 breaking the frame (border) adds depth

Once I got the borders sewn on, it was time to find a backing fabric.I had a remnant that was perfect :) I pressed the fabric with starch alternative. When using my domestic machine, I like a starched back as it glides over the machine bed much easier.
iron the backing

Then it is time to mark the quilt for quilting. I chose to do diamonds in the outer border and the very inside background. They remind me of argyle, a traditional print (we have a lot of jokes in my family about argyle socks being "old man socks").
 marking the quilt

The first step in the quilting process was stitching in the ditch. I am LOVING my walking foot with the stitch in the ditch plate! Then I could move on to the quilting of the background and borders.
stitch in the ditch to stabilize

I chose to fill the center border with a coffee bean free style quilting motif. This is a quilt inspired by my husband, after all, and he is a coffee drinker.
coffee bean filler
All of the applique pieces have a straight stitch all around. Nothing exciting.

I faced the quilt to finish it quickly for the challenge
 completed quilt

Dapper and Cool
in Michigan

For more entries in the challenge check out Persimon Dreams: Project Quilting Well-Dressed Man Challenge
 
EDIT to add - I won the Project Quilting Well-Dressed Man Challenge! Thanks for voting for my quilt :)

Now to a true confession. I basted the facing so that I can take it apart as I have more I want to do with this quilt. I want to quilt it a bit heavier in places ... and give it a dynamic binding treatment. I'm hoping to enter this one in shows ...

Wednesday, March 1, 2017

Well-Dressed Man Challenge - Project Quilting 8.5

 This week is mid-winter break at college, so I am able to give more time to a challenge and this one needed it! Project Quilting's fifth challenge this season is Well-Dressed Man

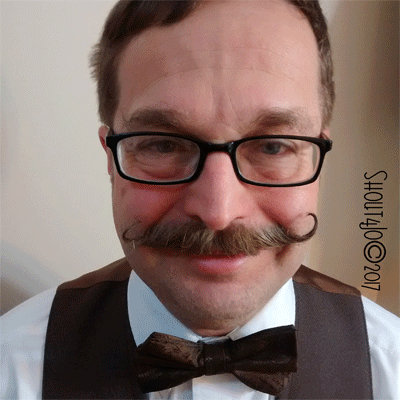
I thought of all kinds of things, but had to go with The Army Guy ... now that he is retired, he has grown an "epic mustache" (according to our daughter's co-worker) and he likes to wear bow ties. How dapper!
 the Army Guy and his "epic mustache"

After taking his picture, I manipulated it in Photoshop and printed it off, using a tiled printing mode so I could get an image bigger than my paper. Of course, I could have taken it to an office place for them to print it on larger paper, but who wants to run out to the store in the throes of creating?
tiled print ready to assemble

So, I taped the image together and traced all those little bits onto paper-backed fusible web. Yes, I remembered to reverse them - what I should have done was to reverse the print, but instead I just put it face side down on my light table for tracing.

Then came the fun ... what colors to use? Do I go natural? or not? I decided to make this a value study and not worry about natural colors at all. I chose blue for the skin, making him cool ;) 

now he is dapper and cool!

Lots of ironing shapes onto fabrics and cutting shapes from fabrics, before I could place them all together. I laid down some parchment paper (from the grocery store) over the large print and started putting the pieces where they belonged. More pressing to keep them from shifting away.
iron pieces to the parchment paper and each other

I wanted the focus to be on his hair, his glasses, his mustache and his bow tie, so I chose to use some purples, keeping it mostly analogous,  but working with warmer purples to contrast nicely. I moved the other way for this shirt and vest, going green, again a color analogous to the blue, a very nice combo on the color wheel. And, bonus! the warm purple against the cool green is almost a complementary color, making the purple bow tie stand out even more.
first day's applique work

After the first day, it was looking pretty good, but my brain and eyes were getting tired, so it was time to put it aside before I made any major mistakes (which happens with tired brain!).

 Today I tweaked the appliques a bit more. Some were in the wrong places, I needed to define some other areas, all subtle differences, but I find it much more pleasing after the second day of manipulating the applique pieces.
 day two of working on the applique

I have chosen background fabric and have a plan for tomorrow's foray into the Sewing Dungeon ... I'm excited to see what happens next!

Wednesday, February 22, 2017

Drawing Fabric

In my Drawing for Graphic Design class, we had to draw fabric in graphite (pencil). The fabric was draped and knotted around an easel and we had to make an interesting composition out of what was there. Light fabrics, heavy fabrics, patterned  fabrics and dark vs light, etc.

My favorite spot was already crowded with other students, so this is what I came up with ... it is a bit washed out in the photo, but you can get the idea ...

I think it turned out pretty good ... I can see areas that I could tweak, but I have probably spent 6 or 7 hours on the drawing as it is and I am done. It needs to be turned in tomorrow morning and I can't stay up all night tweaking a drawing!

Sunday, February 19, 2017

Project Quilting - Bright Challenge

This week I chose my fabrics fairly early, but didn't get around to playing with them until late ... I chose to make a portfolio bag with some of my bright fabrics.

The pink fabric told me it wanted to be the outer fabric so I quilted it with the turquoise as the inner fabric.Cut out the pieces and moved on to the strap.

I was going to use the bright green for the strap ... but it just didn't work for me. I chose a solid black instead which makes the bright print seem brighter.
I challenged myself to use a fancy stitch design on the handle. This is something I have been a bit afraid of since getting my new machine in August. If I've got those stitches, I need to learn to use them!
The bag used three bright fabrics and a solid black.
 I used bright zippers to add to the bright, happy look.
AND I now have a bright, happy portfolio that I can lug magazines or patterns around in. Just in time for a class with Bonnie Hunter next month and with Kim Lapacek the following month!
I might add some more pockets to it later, maybe that green fabric will make an appearance in the middle!

The other entries are found HERE

Friday, February 10, 2017

Where do you find ideas?

I needed to visit a court house today for a document and was tickled to see this floor ... I will be working with some ideas in EQ over the next week ...

What triggers ideas for you?

Wednesday, February 8, 2017

Conversation Hearts - let's finish it up!

Trim your embroidered squares to 6 1/2" 

Cut background fabric into:
1 - 18 1/2" Square
1 - 12 1/2" X 18 1/2" 
2 - 24 1/2" X 6 1/2"
6 - 12 1/2" X 6 1/2"
4 - 6 1/2" squares
5 - 3 1/2" WOF strips (borders)
Assemble the upper right corner as shown:
Add the 18 1/2" square to the left of the unit:
 Assemble the middle section as shown:
Add the 12 1/2" X 18 1/2" rectangle the left of the unit as shown:
 Assemble the bottom section as shown:
Now assemble the field of the quilt:
Take your 3 1/2" strips, and sew them end to end, making one very long strip. I like to sew them together with a 45* angle, but this is not necessary.
Measure the quilt field through the center of the quilt, top to bottom. Take that measurement and cut two pieces from the long border strip. sew these to the sides of your quilt. Press the seam allowance toward the border strips.

Measure through the center of the quilt, side to side. Take this measurement and cut two pieces from the long border strip. Sew these to the top and bottom of your quilt. Press the seam allowance toward the border strips.

My measurements are shown in the diagram below:
Now your top is put together!

Quilt as desired ... I
used a freemotion all over pattern that is reminiscent of a fluer de lys.

Now take your 2 1/2" strips cut from your Fat Quarters and sew them together end to end. Again, I like to sew mine together on the bias, using a 45* angle to avoid bulk. Iron this in half down the length and attach as double fold binding to your quilt. I like to sew the binding to the front, pull binding to the back, glue baste the binding down and then stitch in the ditch from the front, catching the binding on the back.
 Your Conversation Hearts quilt is now finished!

Materials List 
Pieced Heart Blocks 
Embroidered Heart Blocks

Monday, February 6, 2017

We have a Winner!

Using a random number generator, 
we have a winner:
Grandma said...I love blue and yellow.
 
"Grandma"  - contact me by the end of Thursday, February 9, so I can get the book out to you :)


Step Two - Converstaion Hearts

Now it is time for the Embroidered Hearts.
Take inspiration from candies, they are everywhere this time of year, so go on out and buy some if you can't think of words to use on your hearts.

Cut three 8" Squares of background fabric.
  For the hearts. download the heart template and the letters. Insert these images into a document and make sure the images are sized at 6 1/2" wide. Print these pages to use for tracing your embroidery designs.


Trace a heart on the middle of each 8" square of background fabric. 

A light box is a great way to trace these images. If you do not have a light box, you can tape (using painter's tape) the paper and fabric to a window on a bright day and then trace. 
Choose your sayings and trace the letters in the center each heart. Use your favorite method to mark the images. I used a water soluble pencil.
 Choose your embroidery floss colors.
 Using a back stitch, stem stitch, split stitch or a chain stitch embroider the heart and the letters.

If you need a refresher on how to do any of these stitches, check out Sublime Stitching.


Check back on Wednesday for the setting instructions :)