
It is DONE! I even have a hanging sleeve on the quilt and a label (something that seldom happens until needed).
The working title for the quilt has been Monkey Dash - a mash-up of two common names for the block Churn Dash/Monkey Wrench. Once it was quilted, the quilt said it wanted to be called Monkey in the Middle ;)
 When presented with May's A Focus through the Prism challenge, the Monkey Wrench block gave me too may design choices. It may be simple block, but that makes it easier to manipulate and go wild with ideas.
Playing with EQ7, I tried many different designs. This one won out because of the interesting cross that happened in the middle.
I chose to use Yellow for two reasons; the first is because it is the color of banana skins, the second reason is that yellow is the color I wanted to get out of the way first ;)
I chose to make it scrappy with a consistent background. I pulled a very light yellow for the background and several yellows and oranges (with yellow in the prints) and set to work.
The first obstacle came with the fact that I used a 3X3 block in a 10" size. I should have used the 5X5 so I could use a better measurement for my units. Three and 1/3" units within the block means I had to guesstimate a bit to make things fit. For some reason the manufacturers of my rulers ignored that measurement!
Once the top was pieced, I realized that the quilting could draw the quilt up too much and then my quilt would be too small. A small border was added so I could quilt to my heart's content.
The top now called for quilting. How to quilt the top? I chose a traditional quilting design with feathers around the center squares of the blocks.
This choice fit the traditional design of the blocks, but seemed rather bland. That is when the monkey came in to play. I took a silhouette of a monkey hanging from a branch, transferred it to the quilt top and used a faux trapunto technique to make him stand out from the background. To push the trapuntoed design further forward, I used a McTavishing inspired design for the rest of the piece.
The quilt has no binding, I used a facing so that the border becomes a faux binding.
If you would like to see how other quilters interpreted the challenge, check out Persimon Dreams.
The working title for the quilt has been Monkey Dash - a mash-up of two common names for the block Churn Dash/Monkey Wrench. Once it was quilted, the quilt said it wanted to be called Monkey in the Middle ;)
Playing with EQ7, I tried many different designs. This one won out because of the interesting cross that happened in the middle.
I chose to use Yellow for two reasons; the first is because it is the color of banana skins, the second reason is that yellow is the color I wanted to get out of the way first ;)
I chose to make it scrappy with a consistent background. I pulled a very light yellow for the background and several yellows and oranges (with yellow in the prints) and set to work.
The first obstacle came with the fact that I used a 3X3 block in a 10" size. I should have used the 5X5 so I could use a better measurement for my units. Three and 1/3" units within the block means I had to guesstimate a bit to make things fit. For some reason the manufacturers of my rulers ignored that measurement!
Once the top was pieced, I realized that the quilting could draw the quilt up too much and then my quilt would be too small. A small border was added so I could quilt to my heart's content.
The top now called for quilting. How to quilt the top? I chose a traditional quilting design with feathers around the center squares of the blocks.
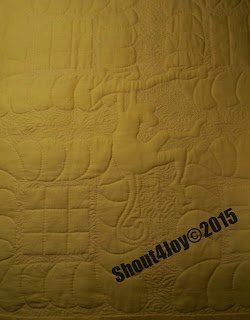
This picture shows the back of the quilt before I sewed on the sleeve and label.
This choice fit the traditional design of the blocks, but seemed rather bland. That is when the monkey came in to play. I took a silhouette of a monkey hanging from a branch, transferred it to the quilt top and used a faux trapunto technique to make him stand out from the background. To push the trapuntoed design further forward, I used a McTavishing inspired design for the rest of the piece.
The quilt has no binding, I used a facing so that the border becomes a faux binding.
If you would like to see how other quilters interpreted the challenge, check out Persimon Dreams.


