This post is part of the Summer Scrap Elimination 2022 hosted by Swan Amity Studio. For more scrap busting ideas, follow along at https://www.swanamity.com/blog
For this Scrap Elimination quilt I went patriotic - this would also look great in team colors, perfect for a tailgate quilt!
Time to get your fabrics ready! Sew along with me - for the picnic size you need:
2 3/4 yards - Assorted Blue Scraps
1 yard - Blue Border
Fabric
1 1/4 yards - Assorted
Red Scraps
1 yard - Assorted
White Scraps
4 yards - Backing
Fabric
1/2 yard - Binding
Fabric
(for cutting and other measurements, please see pattern available for sale: https://www.etsy.com/shop/Shout4JoyQuilter?ref=shop_sugg )
Making the *Kathleen Wheel blocks
STEP ONE:
Take your B 6 White Squares and draw diagonal lines both directions across the back.
Draw a stitching line 1/4” to the right of the center line in each quadrant.
Pair your B White squares right sides together with your B Blue fabric squares.
Stitch on the stitching lines, pivoting on the center diagonal line to move on to the next line.
Cut the units apart on the center diagonal lines and press the seam toward the dark fabric – be careful as these seams are bias edges!
STEP TWO:
Take
your Red C Squares and cut in half diagonally making Triangle units.
Gently hand press the long bias edge in half to find the center of the edge.
Match this center to the seam line of the B unit from Step ONE and sew the C triangle to your B units from STEP ONE. Press seam toward C triangle.
These are now Y units.
Trim your Y units, if needed.
STEP THREE:
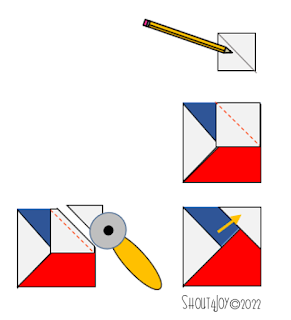
Take your White D squares and draw a diagonal line across the back.
Place your D square on the Y unit, crossing over the seam between the red and blue triangles, as shown and sew on the diagonal line.
Trim D square ¼” from sewn line and press seam toward the white triangle.
STEP FOUR:
Make 13 Kathleen Wheel blocks.
Making the SnowBall Blocks
STEP ONE:
Take four assorted White (D) squares and draw a diagonal line across the back of each one.
STEP TWO:
Match the four (D) units to an Assorted Blue square (A) and sew them as snowball corners as shown, trimming the excess corners and pressing seams toward the A square.
Make 4.
STEP THREE:
Following Steps ONE and TWO, make 8 units with only two Snowballed corners.
Making Square in a Square cornerstones
STEP ONE:
Take the assorted Blue squares (E) and mark a diagonal line across the back of each.
Take your 3 ½” Assorted White or Red squares (F) and sew two of your blue (E) squares to opposite sides of the squares on the drawn line. Trim excess triangle ¼” from seam and press seam toward blue triangle.
STEP THREE:
Take two more blue squares (E) and sew them on the remaining corners of your (F) square, trimming and pressing as in STEP TWO.
Make 12 Red center and 8 White center- Square in a Square blocks.
Assembling the Summer Picnic Quilt
STEP ONE:
For Rows 1 and 5: Take three Kathleen Wheel blocks and two Snowball blocks with only two snowballed corners. Sew them together with a sashing strip between each block as shown. Press seams toward the sashing.
Make two.
For Rows 2 and 4: Take Two Snowball blocks with two corners, one snowball blocks with four corners, and two Kathleen Wheel blocks. Sew them together with a sashing strip between each block as shown. Press seams toward the sashing.
Make two.
For Row 3: Take the remaining Kathleen Wheel blocks and Snowball blocks with four corners. Sew them together with a sashing strip between each block as shown. Press seams toward the sashing.
STEP TWO:
For Sashing Rows 1 and 4: Take five sashing strips and four Color 2 Square in a Square blocks, sewing the SiaS blocks in between sashing strips. Press seams toward the sashing.
Make two.
Make two.
STEP THREE:
Sew the rows together as shown, matching the sashing seams.
STEP FOUR:
Sew your Border Strips together end to end in two sets of three. Use a straight seam to sew them together.
STEP FIVE:
Measure
your quilt top through the center
in both directions.
Cut four border strips to this size.
STEP SIX:
STEP SEVEN:
Sew a color 3 Square in a Square block to either end of a remaining border strip. Press seams toward the border strips.
Make two.
STEP EIGHT:
Sew border strips from STEP SEVEN to the top and bottom of the quilt top. Match border seams.
Quilt as desired and bind.
NOTES:
Consider using thrifted denim for the Sashing Strips, the Snowball Units, and border strips. The Snowballed Pinwheels and Square in a Square blocks are better suited for quilting cottons.
The Snowball blocks would be a great place for some custom/block quilting designs.
This quilt would be great to make in school/team colors for a tailgate quilt.
*The Kathleen Wheel Blocks are named for my mother - I was unable to find a traditional name for this style of pinwheel blocks (and I did check the Barbara Brackman resource!)
These instructions are FREE until the end of July, when I will offer the quilt pattern in three sizes for sale in my Etsy shop. This blog post will become a sew-along without sizes at that point ...
For purchase of this pattern in three sizes, visit my Etsy store:
https://www.etsy.com/shop/Shout4JoyQuilter?ref=shop_sugg


No comments:
Post a Comment