Tuesday, December 13, 2022

Solid, Boring, Grey ...

I mentioned that my mother passed away in January. She was a quilter, too. That meant their home in MI and the place in FL both had plenty of quilts. It has been hard for my dad as everywhere he looks he sees quilts that my mom made. The very hardest is seeing the quilts in the master bedroom.

SO, in FL, my dad took the king sized bed down to two twins and went out and bought "bed in a bag" for those beds. 

He bought grey. solid, boring, grey.

I decided that he needed something better, but didn't want to do regular quilts, so started looking for ideas. And there it was! Northcott's Swoon line offered just the right graphics to make my dad happy, I could get the backing fabric and make matching whole-cloth quilts to give his room a bit more personality ... So I did. 

Can you see how much nicer it is? He can still use the grey sheets, but now he has something beautiful, too! (both comforters have now been hidden away)

I will think through curtains and throw pillows later (they matched the king quilt).

Wednesday, October 12, 2022

A Wedding Quilt

Earlier this year, my mother passed away. She was a prolific quilter and made quilts for those she loved as well as many charity quilts for those in need.

When my nephew announced his engagement, I was asked if I had found the quilt my mother was planning to make for when he got married (we all knew that the engagement was coming soon). Going through her stash, I did not find anything that looked like a quilt for the upcoming wedding.

SO, I reached out to the bride-to-be and asked what colors they were planning for their home and she said ... "neutrals" ... which didn't surprise me, but neutral is hard to pin down. Grey has been the prevailing neutral recently and my mom didn't have much grey in her stash. So I expanded neutral into the warm neutrals and went from the lightest (white) to the darkest (black) in my fabric choices.


I chose to use the pattern Kira by GE Designs as I know that mom had that pattern, I just modernized the setting a bit in my layout, radiating from lightest to darkest. I needed to add a border to bring it up to size, so added just one border (not the two from the pattern).

When choosing a quilting design, I knew mom would have just done a meander as that was what she was most comfortable with, but I chose to do Creeping Fig E2E on the quilt. I knew she would have loved the design (and the bride and groom did, too).

I had to bring my sewing machine along as the binding was not finished when it was time to leave ... so the binding was sewn on the day before the wedding!

The quilt was finished up in time - and looks really good! The warm fabrics in the quilt will go very well with the bed frame that the groom's father made for the couple, while the cooler neutrals keep it from being too lodge-like. (quilt is being held by the groom's sister and grandfather)


It was a lovely outdoor wedding, the gorgeous fall colors were a fantastic backdrop to the ceremony (though it was a bit chilly!)


The groom's father and brother provided the music - all around it was a beautiful wedding and my mother would have loved it.

Even though they weren't opening gifts until the next day, the bride and groom did open up the quilt while I was there. That way they could get the whole story (not just the abbreviated story on the label) from me as well as from my dad. They seemed to like it a lot and tears were shed as we all thought of the provider of the fabrics.

Many prayers were sewn into this quilt - May Jack and Helen be blessed in their new adventure together!


Tuesday, September 6, 2022

Fall 2022 Mystery Started

 last week I started my 2022 Mystery Quilt in my Facebook Group - come join in the fun!

The mystery pattern will be free until Thanksgiving and then the pattern will be for sale in my Etsy shop.

Thursday, August 4, 2022

Mindless Sewing

 While I design plenty of my own quilts, sometimes I just want to sew mindlessly (as in, not proofreading as I sew). 

Currently I am working on two different quilts, same pattern.
One for me, and one for a gift.

This one is for me, I bought a 10" square stack and didn't know what I was going to do with it, set it aside and just recently found it, deciding to make a quilt for ME! (sorry for the fuzzy picture - it was a quick photo!)
This quilt is a wedding gift. It will be way larger than mine, I only want a lap quilt and would like to make this one as a bed-sized quilt (wonder what size they have?). I raided my mom's stash for this one as it is for a relative that should appreciate a gift that has a bit of her in it. This one has a deadline, so I can't set it aside so it is queued up next to my sewing station so I don't forget it!

The pattern I am using is Kira from GE Designs - very easy to follow the directions, but best if you have the Striplogy Squared ruler (in my opinion!).

#KiraGEDesigns
#StripologySquared


Tuesday, July 19, 2022

Cherrywood Challenge - Graffiti

This year I participated in the Cherrywood Graffiti Challenge ... and I am a finalist again this year.

The theme of Graffiti brought lots of different images to mind and it was hard to narrow it down. I finally decided to go with classic wall graffiti and "Joy to the World" by Three Dog Night kept popping into my mind, so it became my inspiration for my piece.

So, here is "A Toast to 3 Dog Night"


My daughter V.R. Lamphere sketched Jeremiah for me after I described my vision.

Thursday, June 30, 2022

SummerTime Picnic Quilt

This post is part of the Summer Scrap Elimination 2022 hosted by Swan Amity Studio. For more scrap busting ideas, follow along at https://www.swanamity.com/blog 

For this Scrap Elimination quilt I went patriotic - this would also look great in team colors, perfect for a tailgate quilt!

Time to get your fabrics ready! Sew along with me - for the picnic size you need:

2 3/4 yards - Assorted Blue Scraps
1 yard  - Blue Border Fabric
1 1/4 yards  - Assorted Red Scraps
1 yard  - Assorted White Scraps
4 yards  - Backing Fabric
1/2 yard - Binding Fabric

(for cutting and other measurements, please see pattern available for sale: https://www.etsy.com/shop/Shout4JoyQuilter?ref=shop_sugg )


Making the *Kathleen Wheel blocks

STEP ONE:

Take your B 6 White Squares and draw diagonal lines both directions across the back.

Draw a stitching line 1/4” to the right of the center line in each quadrant.

Pair your B White squares right sides together with your B Blue fabric squares.

Stitch on the stitching lines, pivoting on the center diagonal line to move on to the next line.

Cut the units apart on the center diagonal lines and press the seam toward the dark fabric – be careful as these seams are bias edges!

STEP TWO:

Take your Red C Squares and cut in half diagonally making Triangle units.           

Gently hand press the long bias edge in half to find the center of the  edge.

Match this center to the seam line of the B unit from Step ONE and sew the C triangle to your B units from STEP ONE. Press seam toward C triangle.

These are now Y units.

Trim your Y units, if needed. 


STEP THREE:

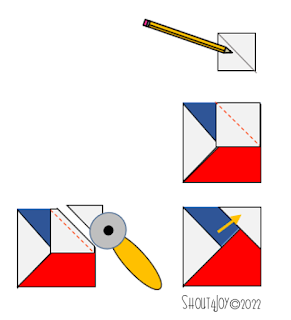
Take your White D squares and draw a diagonal line across the back.

Place your D square on the Y unit, crossing over the seam between the red and blue triangles, as shown and sew on the diagonal line.

Trim D square ¼” from sewn line and press seam toward the white triangle.

STEP FOUR:

Mix your assorted fabric Y units and sew them together in sets of 4 as shown.

Make 13 Kathleen Wheel blocks.


 NOTE: you can use the cut off corners for some bonus units for another project!

Making the SnowBall Blocks

STEP ONE:

Take four assorted White (D) squares and draw a diagonal line across the back of each one.


STEP TWO:

Match the four (D) units to an Assorted Blue square (A) and sew them as snowball corners as shown, trimming the excess corners and pressing seams toward the A square.

Make 4.

STEP THREE:

Following Steps ONE and TWO, make 8 units with only two Snowballed corners.

Making Square in a Square cornerstones

STEP ONE:

Take the assorted Blue squares (E) and mark a diagonal line across the back of each. 


STEP TWO:

 Take your 3 ½” Assorted White or Red squares (F) and sew two of your blue (E) squares to opposite sides of the squares on the drawn line. Trim excess triangle ¼” from seam and press seam toward blue triangle.

STEP THREE:

Take two more blue squares (E) and sew them on the remaining corners of your (F) square, trimming and pressing as in STEP TWO.

 Make 12 Red center and 8 White center- Square in a Square blocks. 

Assembling the Summer Picnic Quilt

STEP ONE:

For Rows 1 and 5: Take three Kathleen Wheel blocks and two Snowball blocks with only two snowballed corners. Sew them together with a sashing strip between each block as shown. Press seams toward the sashing.

Make two.


For Rows 2 and 4: Take Two Snowball blocks with two corners, one snowball blocks with four corners, and two Kathleen Wheel blocks. Sew them together with a sashing strip between each block as shown. Press seams toward the sashing.

Make two.


For Row 3: Take the remaining Kathleen Wheel blocks and Snowball blocks with four corners. Sew them together with a sashing strip between each block as shown. Press seams toward the sashing.

STEP TWO:

            For Sashing Rows 1 and 4: Take five sashing strips and four Color 2 Square in a        Square blocks, sewing the SiaS blocks in between sashing strips. Press seams toward the sashing.

Make two.

             For Sashing Rows 2 and 3: Take five sashing strips, two color 2 Square in a Square blocks, and two color 3 Square in a Square blocks, sewing the SiaS blocks in between sashing strips. Press seams toward the sashing. 

Make two.

STEP THREE:

Sew the rows together as shown, matching the sashing seams.

STEP FOUR:

Sew your Border Strips together end to end in two sets of three. Use a straight seam to sew them together.

STEP FIVE:

Measure your quilt top through the center in both directions.

Cut four border strips to this size.


STEP SIX:

Sew two strips to opposite sides of the quilt top. Pin the border to the top and sew. 
Press seams toward border strips.

STEP SEVEN:

Sew a color 3 Square in a Square block to either end of a remaining border strip. Press seams toward the border strips.

Make two.

STEP EIGHT:

Sew border strips from STEP SEVEN to the top and bottom of the quilt top. Match             border seams.


Your quilt top is complete!

Quilt as desired and bind.

 NOTES:

Consider using thrifted denim for the Sashing Strips, the Snowball Units, and border strips. The Snowballed Pinwheels and Square in a Square blocks are better suited for quilting cottons.

The Snowball blocks would be a great place for some custom/block quilting designs.

This quilt would be great to make in school/team colors for a tailgate quilt.

*The Kathleen Wheel Blocks are named for my mother - I was unable to find a traditional name for this style of pinwheel blocks (and I did check the Barbara Brackman resource!)

These instructions are FREE until the end of July, when I will offer the quilt pattern in three sizes for sale in my Etsy shop. This blog post will become a sew-along without sizes at that point ...


For purchase of this pattern in three sizes, visit my Etsy store:
https://www.etsy.com/shop/Shout4JoyQuilter?ref=shop_sugg